
Building your own home server, part #3
This blog is part of the 4 posts long series "Build your own home server (2015)":
- Building your own home server, part #1 (January 19, 2015)
- Building your own home server, part #2 (January 21, 2015)
- Building your own home server, part #3 (January 23, 2015)
- Building your own home server, part #4 (January 25, 2015)
Software
Ok, our home server hardware is ready, but what software are we going to run? That totally depends on your use case, but I guess at least you’ll want to run a file server on it. In this post, we’ll set up a not-so-basic Samba file server using Ubuntu Linux.
With a Samba file server, you can serve both Windows and Linux clients, with fine-grained access right management. As the file-system, I’ll be setting up the super-robust ZFS, which is a next-gen file-system with extremely high reliability and some cool features. I’ll also set up automatic snapshots and integrate them into Windows shadow copies, so Windows clients will be able to restore files that they have mistakenly deleted on their own.
As the operating system, we’ll be using a long-term support release of Ubuntu Linux. You can use any other Linux you want of course, but the installation instructions here will be for Ubuntu 14.04, which does support ZFS and our hardware, and is available for free.
Server grade hardware
And now comes the seriously cool part. As we bought server-grade hardware, we can take advantage of server-grade management tools. In particular, here’s what we won’t need:
- Spare monitor
- Keyboard
- Graphics card
- USB thumb drive
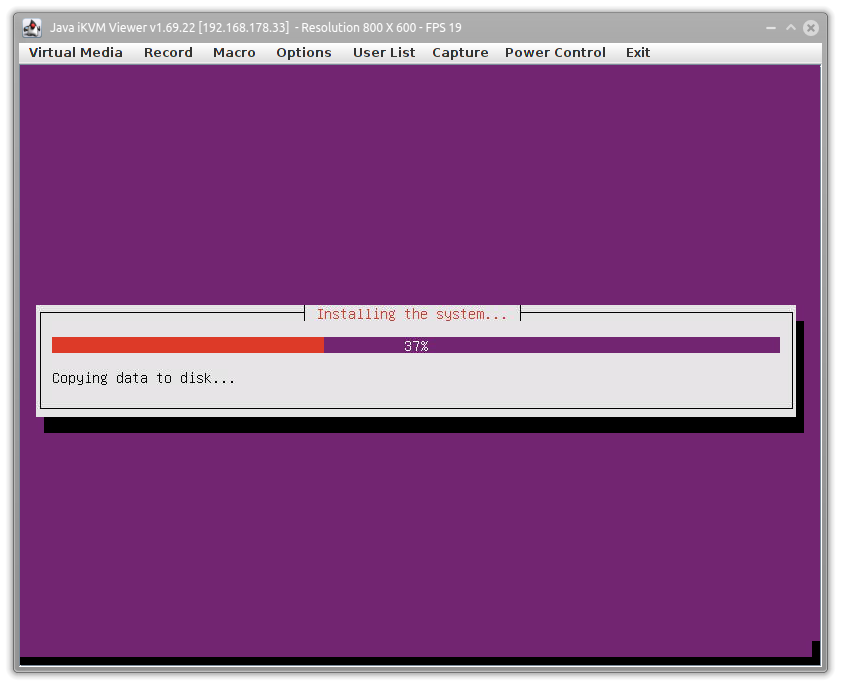
Instead, we’ll forward the screen output from the server via network to our desktop machine, mount the installation media over network and even restart the machine without getting up from our desk!
All you need is to figure out which IP address has been assigned to the network ports and point your browser at it. You’ll get the management dashboard, from which you can redirect the console.
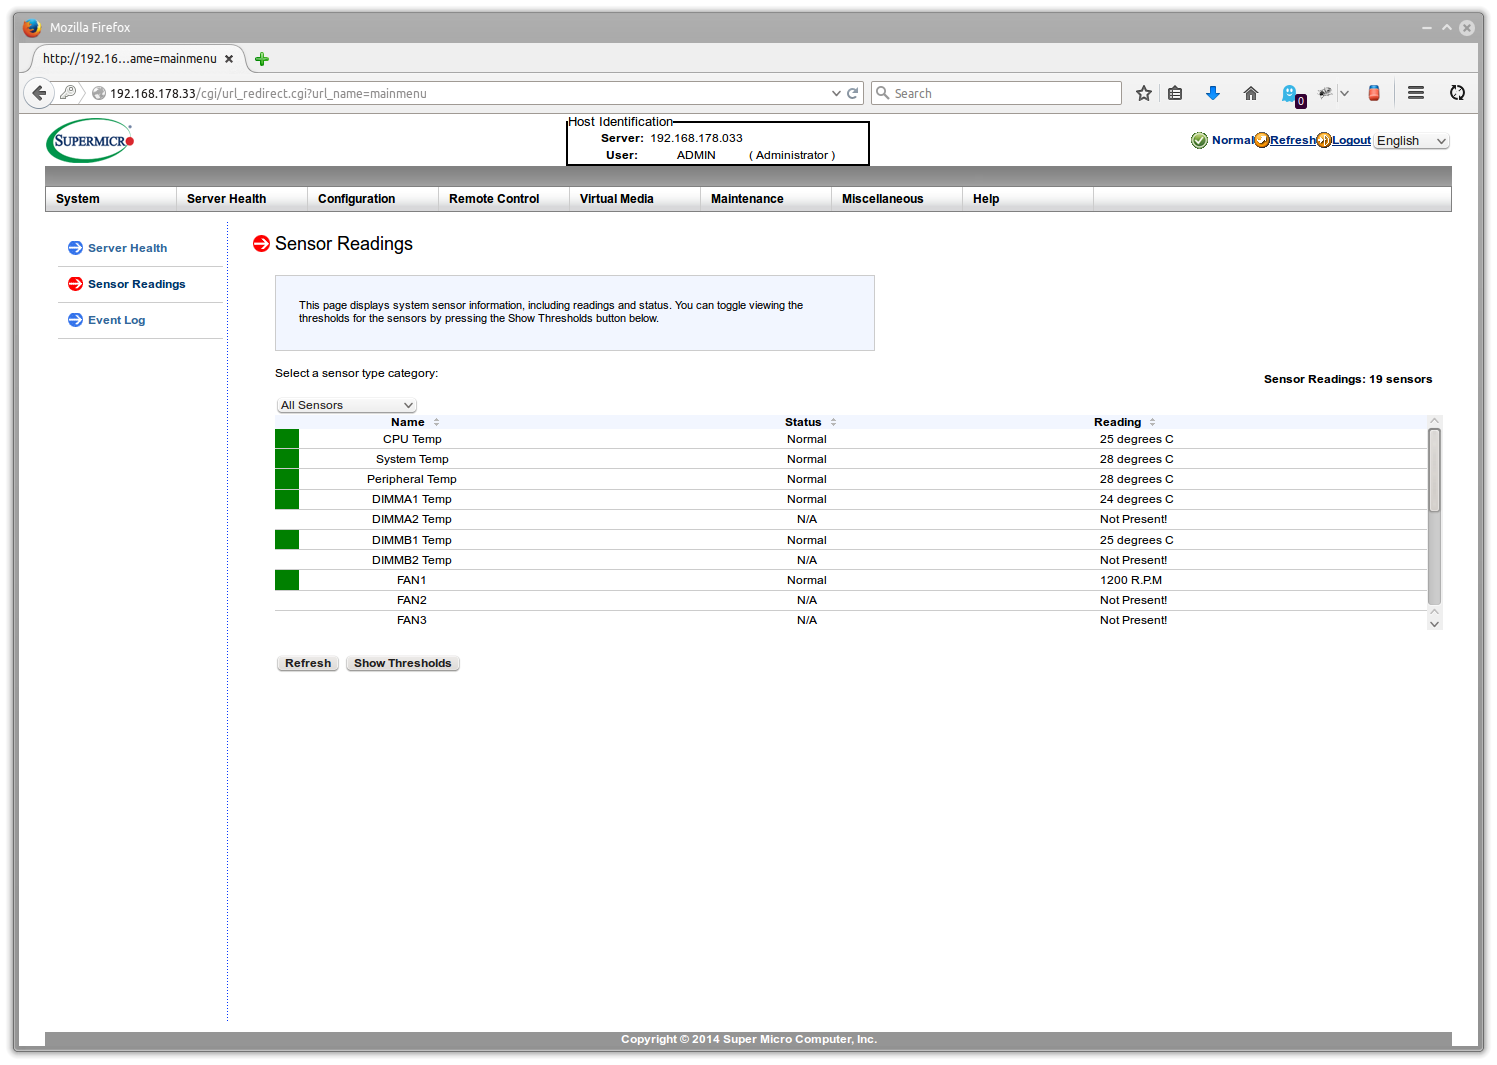
The login is “ADMIN”/”ADMIN”, just in case. What’s seriously cool is that we can now open a “remote console” here which will forward the display output to our desktop, even while the machine is starting up. In fact, you can even get the BIOS welcome screen:

From here on, it’s smooth sailing, or as my administrator friend MoepMan likes to say: “Stuff works just as in the advertisement!” You plug in your Ubuntu ISO using virtual media, start the installer as always and follow the on-screen instructions, and in less than 20 minutes, the machine will boot into Linux. There are only three things you need to double-check during the setup:
- Make sure to install to the SSD drive. When the installer asks you which drive to use, take the 40 GiB sized, and just use the guided partitioning.
- Double-check that the first network port is selected as the default.
- When you can select which software to install, pick OpenSSH server and Samba.
That’s it, some waiting, and a reboot later, you’re all set.
Network administration
Once the installer has finished, it’s time to log in using SSH. On Linux, SSH is built-in, so you can just use ssh your-server-name and log in, on Windows you’ll need to get an SSH client like Putty.
With SSH, you get a console on the server, pretty much the same as if you would log in sitting in front of it. In fact, you can run the whole installation by just logging in on the server through the console forwarding, but I’ll use SSH because it is quite a bit more comfortable if I can copy/paste into my console window.
As we’re setting up the server, we’ll be running lots of commands with administrator rights. The best approach is to elevate us once and then just do everything as an administrator. On Ubuntu, simply use sudo -i once logged in to become root (that is, administrator.)
The first step should be to update all installed packages, which you do using:
$ apt-get update && apt-get upgrade
You’ll probably have to reboot at this point, so just type in reboot and log in again. On Ubuntu, you can’t log-in as root, so make sure you log in as your normal user and then switch to root.
ZFS
The first thing we want to set up is ZFS. Unfortunately, due to licensing restrictions, it’s not shipped by default with Ubuntu, so we need to register a repository and fetch it from there. That’s actually not that complicated:
$ apt-add-repository ppa:zfs-native/stable
$ apt-get update
$ apt-get install ubuntu-zfs zfs-auto-snapshot
This will take quite some time to build the kernel modules, so be patient. Now we can create our first pool. ZFS works in two layers: There are pools, which group hard drives, and then there are file systems which are created inside a pool. We’ll be using a mirrored pool over our two hard drives and create two file systems inside it.
Before we can do this, we have to check our hard drives though, in particular, we want to know the sector size. Modern hard drives have sectors with 4096 bytes, but due to legacy reasons, they often advertise as 512 bytes sectors, and that mismatch can cost us some performance. Let’s check using fdisk -l, which will print output similar to this:
Disk /dev/sda: 2000.4 GB, 2000398934016 bytes
255 heads, 63 sectors/track, 243201 cylinders, total 3907029168 sectors
Units = sectors of 1 * 512 = 512 bytes
Sector size (logical/physical): 512 bytes / 4096 bytes
I/O size (minimum/optimal): 4096 bytes / 4096 bytes
Disk identifier: 0x00000000
Bingo, our hard drive uses 4096 sized sectors. Now we’re ready to create our first pool. We want to add our hard drives by their disk ID, so the pool will survive if we swap the cables. You can see all drives by id if you call ls /dev/disk/by-id. The two Western Digital should be easy to spot, with their name starting with ata-WDC-WD20EFRX.
To create the pool, call:
$ zpool create tank -o ashift=12 mirror ata-WDC_WD20EFRX-1 ata-WDC_WD20EFRX-2
The ashift=12 line tells ZFS to use blocks with \(2^{12}=4096\) bytes. We’re calling the pool tank, because this is what the ZFS documentation always uses, and because it doesn’t matter much :)
If you get an error like this, don’t worry:
does not contain an EFI label but it may contain partition
Just use the -f flag as recommended, after double checking that you are using the right drives. I got this for one disk drive for whatever reason, but as I don’t care about the data, we can just go ahead and ignore this. ZFS will then take over ownership of the drive and just destroy anything that is written on it.
You can now go to /tank and see that it’s running. We’ll also want to create a few file systems. Let’s say we’ll have two users on our server (Markus and Raymund – you can create users using adduser username), and we want a shared file system. Nothing easier than that:
$ zfs create tank/Markus
$ zfs create tank/Raymund
$ zfs create tank/Shared
In ZFS, you should create one file system for every “use” case, as many settings are per-file-system (compression, deduplication, sharing, etc.) Moreover, file systems don’t cost you anything.
In case your system disk fails, you’ll want to reimport the pool instead of recreating it. The command to do this is:
$ zpool import -f tank
All that remains to be done is to set the access rights for the file systems, which are simply mounted as directories below /tank, and also behave like them. We’ll assume that each user owns his folder:
$ chown -R raymund /tank/Raymund
$ chown -R markus /tank/Markus
This sets the folder owners, from there on, the users can log in and set the permissions to their liking.
Samba
Samba is the Linux implementation of the SMB protocol used by Windows for file sharing. Setting up Samba is very simple, as its configuration is contained in a single file. We’ll set up three shares: Two for the users which can be only used with a valid log-in, and a public share for the Shared folder which can be read without logging in onto the server. For writing into Shared, a valid account will be still required.
All we need is to edit the /etc/samba/smb.conf file and add the following lines at the end:
[Shared]
path = /tank/Shared
public = yes
writable = yes
create mask = 0775
directory mask = 0775

# Duplicate this for Raymund
[markus]
path = /tank/Markus
public = no
valid users = markus
writable = yes
The part within the brackets is the name of the share, and the rest should be self explaining. On the public shared directory, we set the file access masks such that everyone can read the data, but only the user who created a file can modify it again. One quick restart of the samba server using service smbd restart, and you should see the network shares from Windows.
Volume shadow copies for Samba using ZFS
One major feature of ZFS are zero-cost snap-shots. Unlike other file systems, ZFS is always copy-on-write, so you can store the state of the file system at a particular moment in time for free by simply creating a snapshot. Later, if you find that you want to restore a file, you just open the snapshot and take it from there. This is a bit similar to Windows’ “file history”, but works on the file-system level instead of individual files. The cool thing is that we can expose ZFS snapshots to Windows clients through through the file history interface right in their explorer.
The setup is straightforward, but a bit tricky. In particular, using the zfs-auto-snapshot script is not enough, as Samba requires the snapshots in a particular format. Each snapshot must contain the date and time in UTC, with a uniform prefix. So we just roll our own script to do this: zfs-snapshot. This scripts must be started regularly (every 15 minutes, for example), and what it’ll do is create a snapshot in the right format and also automatically delete old snapshots. Using the default settings, it will keep only hourly snapshots for one week, then daily snapshots for a month, then monthly for a year and so forth – that is, the older the snapshot, the lower the frequency. I’ve stored the script as /usr/local/bin/zfs-snapshot.py. Now let’s set up a cron job – basically, a simple timer which will call our script regularly:
$ cat >> /etc/cron.d/zfs-snapshot << EOL
> PATH="/usr/bin:/bin:/usr/sbin:/sbin:/usr/local/bin"
>
> */15 * * * * root zfs-snapshot.py
> EOL
$ chmod +x /etc/cron.d/zfs-snapshot</pre>
This will run the zfs-snapshot script every 15 minutes. All that is left is integrating it with Samba, so the snapshots actually show up in Windows. For each share, append the following lines:
vfs objects = shadow_copy2
shadow: snapdir = .zfs/snapshot
shadow: sort = desc
shadow: format = shadow_copy-%Y.%m.%d-%H.%M.%S
They’re all the same for each network share, as they are all hosted on their own ZFS filesystems and hence the snapshots are in the .zfs folder. Yet another reason to use a separate file system per share! That’s it, one more restart and you should see snapshots showing up in Windows.
At this stage, the rest totally depends on your needs. We have basic file sharing set up, on a robust file system with automatic snapshots. Next time, we’ll look at power usage and how to integrate the APC UPS.